SpringMVC上传下载实例
- 2022-12-05 11:18:54
- 910次 极悦
文件上传是任何 Web 应用程序中非常常见的任务。下面我们将学习Spring 文件上传,特别是针对单个文件和多个文件的Spring MVC 文件上传。
Spring MVC 文件上传
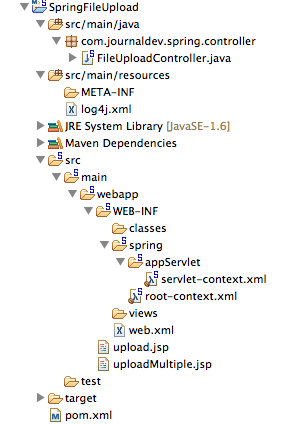
Spring MVC 框架通过集成 Apache Commons FileUpload API 提供了对文件上传的支持。上传文件的过程非常简单,只需要简单的配置。我们将在 STS 中创建一个简单的Spring MVC项目,如下图所示。

大部分部分是由 STS 工具生成的样板代码,我们将重点关注使用 Spring 文件上传集成所需的更改。
Apache Commons FileUpload 的 Maven 依赖项
首先,我们需要在我们的 pom.xml 文件中添加 Apache Commons FileUpload 依赖项,以便所需的 jar 文件成为 Web 应用程序的一部分。下面是我的 pom.xml 文件中的依赖片段。
<!-- Apache Commons FileUpload -->
<dependency>
	<groupId>commons-fileupload</groupId>
	<artifactId>commons-fileupload</artifactId>
	<version>1.3.1</version>
</dependency>
<!-- Apache Commons IO -->
<dependency>
	<groupId>commons-io</groupId>
	<artifactId>commons-io</artifactId>
	<version>2.4</version>
</dependency>
Spring 文件上传表单视图
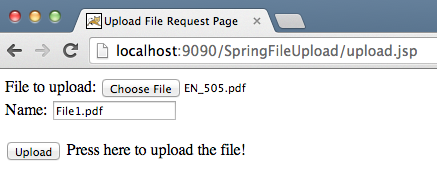
我们将创建两个 JSP 页面以允许在 spring web 应用程序中上传单个和多个文件。upload.jsp查看代码:
<%@ taglib uri="http://java.sun.com/jsp/jstl/core" prefix="c" %>
<%@ page session="false" %>
<html>
<head>
<title>Upload File Request Page</title>
</head>
<body>
	<form method="POST" action="uploadFile" enctype="multipart/form-data">
		File to upload: <input type="file" name="file"><br />
		Name: <input type="text" name="name"><br /> <br />
		<input type="submit" value="Upload"> Press here to upload the file!
	</form>
</body>
</html>
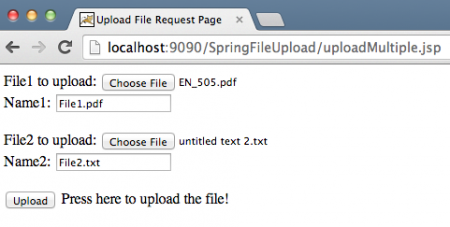
uploadMultiple.jsp查看代码:
<%@ taglib uri="http://java.sun.com/jsp/jstl/core" prefix="c" %>
<%@ page session="false" %>
<html>
<head>
<title>Upload Multiple File Request Page</title>
</head>
<body>
	<form method="POST" action="uploadMultipleFile" enctype="multipart/form-data">
		File1 to upload: <input type="file" name="file"><br />
		Name1: <input type="text" name="name"><br /> <br />
		File2 to upload: <input type="file" name="file"><br />
		Name2: <input type="text" name="name"><br /> <br />
		<input type="submit" value="Upload"> Press here to upload the file!
	</form>
</body>
</html>
请注意,这些文件是简单的 HTML 文件,我没有使用任何 JSP 或 Spring 标记以避免复杂性。需要注意的重点是 form enctype应该是multipart/form-data,这样 Spring web 应用程序就知道请求包含需要处理的文件数据。还要注意,对于多个文件,输入字段中的表单字段“文件”和“名称”是相同的,因此数据将以数组的形式发送。我们将获取输入数组并解析文件数据并将其存储在给定的文件名中。
Spring MVC 多部分配置
要利用 Apache Commons FileUpload 处理多部分请求,我们需要做的就是将multipartResolverbean 配置为 class org.springframework.web.multipart.commons.CommonsMultipartResolver。我们最终的 Spring 配置文件如下所示。servlet-context.xml代码:
<?xml version="1.0" encoding="UTF-8"?>
<beans:beans xmlns="http://www.springframework.org/schema/mvc"
	xmlns:xsi="http://www.w3.org/2001/XMLSchema-instance" xmlns:beans="http://www.springframework.org/schema/beans"
	xmlns:context="http://www.springframework.org/schema/context"
	xsi:schemaLocation="http://www.springframework.org/schema/mvc http://www.springframework.org/schema/mvc/spring-mvc.xsd
		http://www.springframework.org/schema/beans http://www.springframework.org/schema/beans/spring-beans.xsd
		http://www.springframework.org/schema/context http://www.springframework.org/schema/context/spring-context.xsd">
	<!-- DispatcherServlet Context: defines this servlet's request-processing
		infrastructure -->
	<!-- Enables the Spring MVC @Controller programming model -->
	<annotation-driven />
	<!-- Handles HTTP GET requests for /resources/** by efficiently serving
		up static resources in the ${webappRoot}/resources directory -->
	<resources mapping="/**" location="/" />
	<!-- Resolves views selected for rendering by @Controllers to .jsp resources
		in the /WEB-INF/views directory -->
	<beans:bean
		class="org.springframework.web.servlet.view.InternalResourceViewResolver">
		<beans:property name="prefix" value="/WEB-INF/views/" />
		<beans:property name="suffix" value=".jsp" />
	</beans:bean>
	<beans:bean id="multipartResolver"
		class="org.springframework.web.multipart.commons.CommonsMultipartResolver">
		 <!-- setting maximum upload size -->
		<beans:property name="maxUploadSize" value="100000" />
	</beans:bean>
	<context:component-scan base-package="com.journaldev.spring.controller" />
</beans:beans>
请注意,我通过为multipartResolver bean提供maxUploadSize属性值来设置最大上传大小限制。如果您查看类的源代码,您会看到在下面的方法中定义并初始化了一个名为 multipartResolver 的 MultipartResolver 变量。DispatcherServlet
private void initMultipartResolver(ApplicationContext context)
  {
    try
    {
      this.multipartResolver = ((MultipartResolver)context.getBean("multipartResolver", MultipartResolver.class));
      if (this.logger.isDebugEnabled()) {
        this.logger.debug("Using MultipartResolver [" + this.multipartResolver + "]");
      }
    }
    catch (NoSuchBeanDefinitionException ex)
    {
      this.multipartResolver = null;
      if (this.logger.isDebugEnabled())
        this.logger.debug("Unable to locate MultipartResolver with name 'multipartResolver': no multipart request handling provided");
    }
  }
使用此配置,任何 enctype 为 multipart/form-data 的请求都将在传递给 Controller 类之前由 multipartResolver 处理。
Spring文件上传控制器类
控制器类代码非常简单,我们需要为uploadFile和uploadMultipleFile URI 定义处理程序方法。FileUploadController.java代码:
package com.journaldev.spring.controller;
import java.io.BufferedOutputStream;
import java.io.File;
import java.io.FileOutputStream;
import org.slf4j.Logger;
import org.slf4j.LoggerFactory;
import org.springframework.stereotype.Controller;
import org.springframework.web.bind.annotation.RequestMapping;
import org.springframework.web.bind.annotation.RequestMethod;
import org.springframework.web.bind.annotation.RequestParam;
import org.springframework.web.bind.annotation.ResponseBody;
import org.springframework.web.multipart.MultipartFile;
/**
 * Handles requests for the application file upload requests
 */
@Controller
public class FileUploadController {
	private static final Logger logger = LoggerFactory
			.getLogger(FileUploadController.class);
	/**
	 * Upload single file using Spring Controller
	 */
	@RequestMapping(value = "/uploadFile", method = RequestMethod.POST)
	public @ResponseBody
	String uploadFileHandler(@RequestParam("name") String name,
			@RequestParam("file") MultipartFile file) {
		if (!file.isEmpty()) {
			try {
				byte[] bytes = file.getBytes();
				// Creating the directory to store file
				String rootPath = System.getProperty("catalina.home");
				File dir = new File(rootPath + File.separator + "tmpFiles");
				if (!dir.exists())
					dir.mkdirs();
				// Create the file on server
				File serverFile = new File(dir.getAbsolutePath()
						+ File.separator + name);
				BufferedOutputStream stream = new BufferedOutputStream(
						new FileOutputStream(serverFile));
				stream.write(bytes);
				stream.close();
				logger.info("Server File Location="
						+ serverFile.getAbsolutePath());
				return "You successfully uploaded file=" + name;
			} catch (Exception e) {
				return "You failed to upload " + name + " => " + e.getMessage();
			}
		} else {
			return "You failed to upload " + name
					+ " because the file was empty.";
		}
	}
	/**
	 * Upload multiple file using Spring Controller
	 */
	@RequestMapping(value = "/uploadMultipleFile", method = RequestMethod.POST)
	public @ResponseBody
	String uploadMultipleFileHandler(@RequestParam("name") String[] names,
			@RequestParam("file") MultipartFile[] files) {
		if (files.length != names.length)
			return "Mandatory information missing";
		String message = "";
		for (int i = 0; i < files.length; i++) {
			MultipartFile file = files[i];
			String name = names[i];
			try {
				byte[] bytes = file.getBytes();
				// Creating the directory to store file
				String rootPath = System.getProperty("catalina.home");
				File dir = new File(rootPath + File.separator + "tmpFiles");
				if (!dir.exists())
					dir.mkdirs();
				// Create the file on server
				File serverFile = new File(dir.getAbsolutePath()
						+ File.separator + name);
				BufferedOutputStream stream = new BufferedOutputStream(
						new FileOutputStream(serverFile));
				stream.write(bytes);
				stream.close();
				logger.info("Server File Location="
						+ serverFile.getAbsolutePath());
				message = message + "You successfully uploaded file=" + name
						+ "<br />";
			} catch (Exception e) {
				return "You failed to upload " + name + " => " + e.getMessage();
			}
		}
		return message;
	}
}
请注意使用 Spring 注释使我们的生活更轻松,代码看起来更易读。uploadFileHandlermethod 用于处理单个文件上传场景,而uploadMultipleFileHandlermethod 用于处理多个文件上传场景。实际上,我们可以用一种方法来处理这两种情况。现在将应用程序导出为 WAR 文件并将其部署到 Tomcat servlet 容器中。当我们运行我们的应用程序时,下图向我们展示了请求和响应。
Spring MVC 文件上传示例


您可以检查服务器日志以了解文件的存储位置。如果大家想了解更多相关知识,不妨来关注一下本站的SpringMVC教程,里面还有更丰富的知识等着大家去学习,希望对大家能够有所帮助。
选你想看
你适合学Java吗?4大专业测评方法
代码逻辑 吸收能力 技术学习能力 综合素质
先测评确定适合在学习
价值1998元实验班免费学


 在线咨询
在线咨询
 免费试学
免费试学