更新时间:2021-08-17 09:29:37 来源:极悦 浏览665次
目前在集群中处理定时任务的方式不是正真的分布式处理方式,而是一种伪分布式,这种方式存在一个明显的缺陷就是当集群中机器宕机,那么整个定时任务就会挂掉或者不能一次性跑完,会对业务产生严重的影响
利用spring+quartz构建一套真正的分布式定时任务系统,经过查阅相关资料得知:quartz框架是原生就支持分布式定时任务的
开发IDE:Intellij IDEA
JDK版本:1.8
Spring版本:4.2.6
Quartz版本:2.2.1
Spring与Quartz集成配置
<?xml version="1.0" encoding="UTF-8"?>
<beans xmlns="http://www.springframework.org/schema/beans"
       xmlns:xsi="http://www.w3.org/2001/XMLSchema-instance" xmlns:context="http://www.springframework.org/schema/context"
       xsi:schemaLocation="http://www.springframework.org/schema/beans
            http://www.springframework.org/schema/beans/spring-beans-4.0.xsd http://www.springframework.org/schema/context http://www.springframework.org/schema/context/spring-context.xsd">
    <context:component-scan base-package="com.aaron.clusterquartz.job"/>
    <bean name="dataSource" class="org.springframework.jndi.JndiObjectFactoryBean">
        <!-- tomcat -->
        <!--<property name="jndiName" value="java:comp/env/jndi/mysql/quartz"/>-->
        <!-- jboss -->
        <property name="jndiName" value="jdbc/quartz"/>
    </bean>
    <!-- 分布式事务配置 start -->
    <!-- 配置线程池-->
    <bean name="executor" class="org.springframework.scheduling.concurrent.ThreadPoolTaskExecutor">
        <property name="corePoolSize" value="15"/>
        <property name="maxPoolSize" value="25"/>
        <property name="queueCapacity" value="100"/>
    </bean>
    <bean name="transactionManager" class="org.springframework.jdbc.datasource.DataSourceTransactionManager">
        <property name="dataSource" ref="dataSource"/>
    </bean>
    <!-- 配置调度任务-->
    <bean name="quartzScheduler" class="org.springframework.scheduling.quartz.SchedulerFactoryBean">
        <property name="configLocation" value="classpath:quartz.properties"/>
        <property name="dataSource" ref="dataSource"/>
        <property name="transactionManager" ref="transactionManager"/>
        <!-- 任务唯一的名称,将会持久化到数据库-->
        <property name="schedulerName" value="baseScheduler"/>
        <!-- 每台集群机器部署应用的时候会更新触发器-->
        <property name="overwriteExistingJobs" value="true"/>
        <property name="applicationContextSchedulerContextKey" value="appli"/>
        <property name="jobFactory">
            <bean class="com.aaron.clusterquartz.autowired.AutowiringSpringBeanJobFactory"/>
        </property>
        <property name="triggers">
            <list>
                <ref bean="printCurrentTimeScheduler"/>
            </list>
        </property>
        <property name="jobDetails">
            <list>
                <ref bean="printCurrentTimeJobs"/>
            </list>
        </property>
        <property name="taskExecutor" ref="executor"/>
    </bean>
    <!-- 配置Job详情 -->
    <bean name="printCurrentTimeJobs" class="org.springframework.scheduling.quartz.JobDetailFactoryBean">
        <property name="jobClass" value="com.aaron.clusterquartz.job.PrintCurrentTimeJobs"/>    <!--因为我使用了spring的注解,所以这里可以不用配置scheduler的属性-->
        <!--<property name="jobDataAsMap">
            <map>
                <entry key="clusterQuartz" value="com.aaron.framework.clusterquartz.job.ClusterQuartz"/>
            </map>
        </property>-->
        <property name="durability" value="true"/>
        <property name="requestsRecovery" value="false"/>
    </bean>
    <!-- 配置触发时间 -->
    <bean name="printCurrentTimeScheduler" class="com.aaron.clusterquartz.cron.PersistableCronTriggerFactoryBean">
        <property name="jobDetail" ref="printCurrentTimeJobs"/>
        <property name="cronExpression">
            <value>0/10 * * * * ?</value>
        </property>
        <property name="timeZone">
            <value>GMT+8:00</value>
        </property>
    </bean>
    <!-- 分布式事务配置 end -->
</beans>
quartz属性文件
#============================================================================
# Configure JobStore
# Using Spring datasource in quartzJobsConfig.xml
# Spring uses LocalDataSourceJobStore extension of JobStoreCMT
#============================================================================
org.quartz.jobStore.useProperties=true
org.quartz.jobStore.tablePrefix = QRTZ_
org.quartz.jobStore.isClustered = true
org.quartz.jobStore.clusterCheckinInterval = 5000
org.quartz.jobStore.misfireThreshold = 60000
org.quartz.jobStore.txIsolationLevelReadCommitted = true
# Change this to match your DB vendor
org.quartz.jobStore.class = org.quartz.impl.jdbcjobstore.JobStoreTX
org.quartz.jobStore.driverDelegateClass = org.quartz.impl.jdbcjobstore.StdJDBCDelegate
#============================================================================
# Configure Main Scheduler Properties
# Needed to manage cluster instances
#============================================================================
org.quartz.scheduler.instanceId=AUTO
org.quartz.scheduler.instanceName=MY_CLUSTERED_JOB_SCHEDULER
org.quartz.scheduler.rmi.export = false
org.quartz.scheduler.rmi.proxy = false
#============================================================================
# Configure ThreadPool
#============================================================================
org.quartz.threadPool.class = org.quartz.simpl.SimpleThreadPool
org.quartz.threadPool.threadCount = 10
org.quartz.threadPool.threadPriority = 5
org.quartz.threadPool.threadsInheritContextClassLoaderOfInitializingThread = true
相关类说明
AutowiringSpringBeanJobFactory类是为了可以在scheduler中使用spring注解,如果不使用注解,可以不适用该类,而直接使用
SpringBeanJobFactory
package com.aaron.clusterquartz.autowired;
import org.quartz.spi.TriggerFiredBundle;
import org.springframework.beans.BeansException;
import org.springframework.beans.factory.config.AutowireCapableBeanFactory;
import org.springframework.context.ApplicationContext;
import org.springframework.context.ApplicationContextAware;
import org.springframework.scheduling.quartz.SpringBeanJobFactory;
/**
 * @author
 * @description 使job类支持spring的自动注入
 * @date 2016-05-27
 */
public class AutowiringSpringBeanJobFactory extends SpringBeanJobFactory implements ApplicationContextAware{
    private transient AutowireCapableBeanFactory beanFactory;
    public void setApplicationContext(ApplicationContext applicationContext) throws BeansException
    {
        beanFactory = applicationContext.getAutowireCapableBeanFactory();
    }
    @Override
    protected Object createJobInstance(TriggerFiredBundle bundle) throws Exception
    {
        Object job = super.createJobInstance(bundle);
        beanFactory.autowireBean(job);
        return job;
    }
}
package com.aaron.clusterquartz.job;
import com.arron.util.DateUtils;
import org.apache.commons.logging.Log;
import org.apache.commons.logging.LogFactory;
import org.quartz.JobExecutionContext;
import org.quartz.JobExecutionException;
import org.springframework.beans.factory.annotation.Autowired;
import org.springframework.scheduling.quartz.QuartzJobBean;
import java.util.Date;
/**
 * @author
 * @description 一句话描述该文件的用途
 * @date 2016-05-23
 */
public class PrintCurrentTimeJobs extends QuartzJobBean
{
    private static final Log LOG_RECORD = LogFactory.getLog(PrintCurrentTimeJobs.class);
  //这里就是因为有上文中的AutowiringSpringBeanJobFactory才可以使用@Autowired注解,否则只能在配置文件中设置这属性的值
    @Autowired
    private ClusterQuartz clusterQuartz;
    protected void executeInternal(JobExecutionContext jobExecutionContext) throws JobExecutionException
    {
        LOG_RECORD.info("begin to execute task," + DateUtils.dateToString(new Date()));
        clusterQuartz.printUserInfo();
        LOG_RECORD.info("end to execute task," + DateUtils.dateToString(new Date()));
    }
}
测试结果:
由于只有一台电脑,所有开了8080和8888两个端口来测试的,上面的定时任务设置了每10秒运行一次。
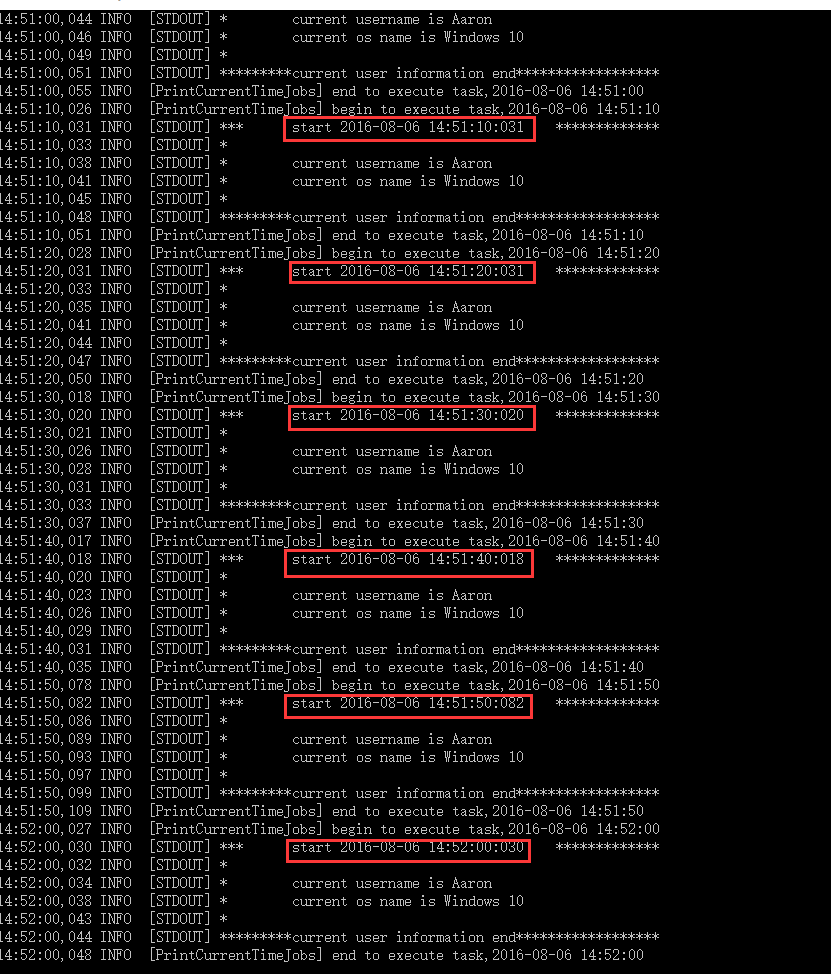
当只启动8080端口时,可以看到控制台每隔10秒打印一条语句

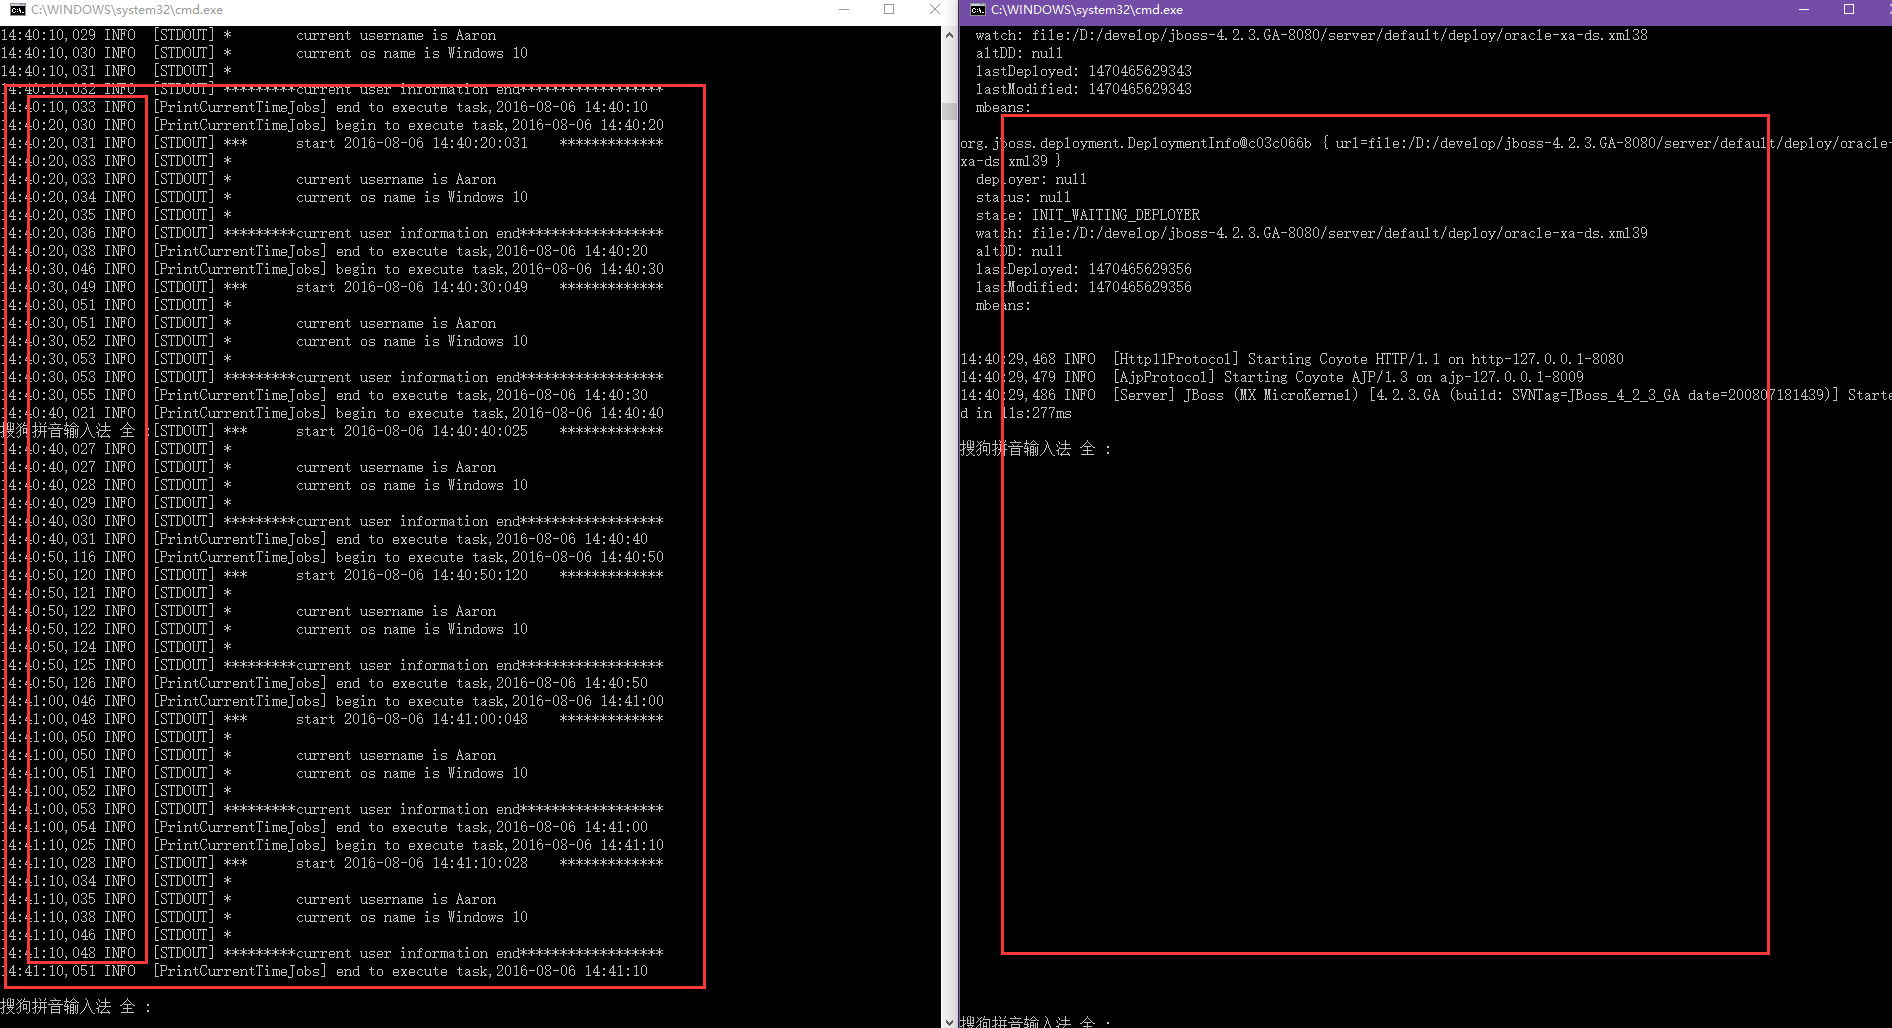
两个端口同时启动的对比测试中可以看到,只有一个端口在跑定时任务

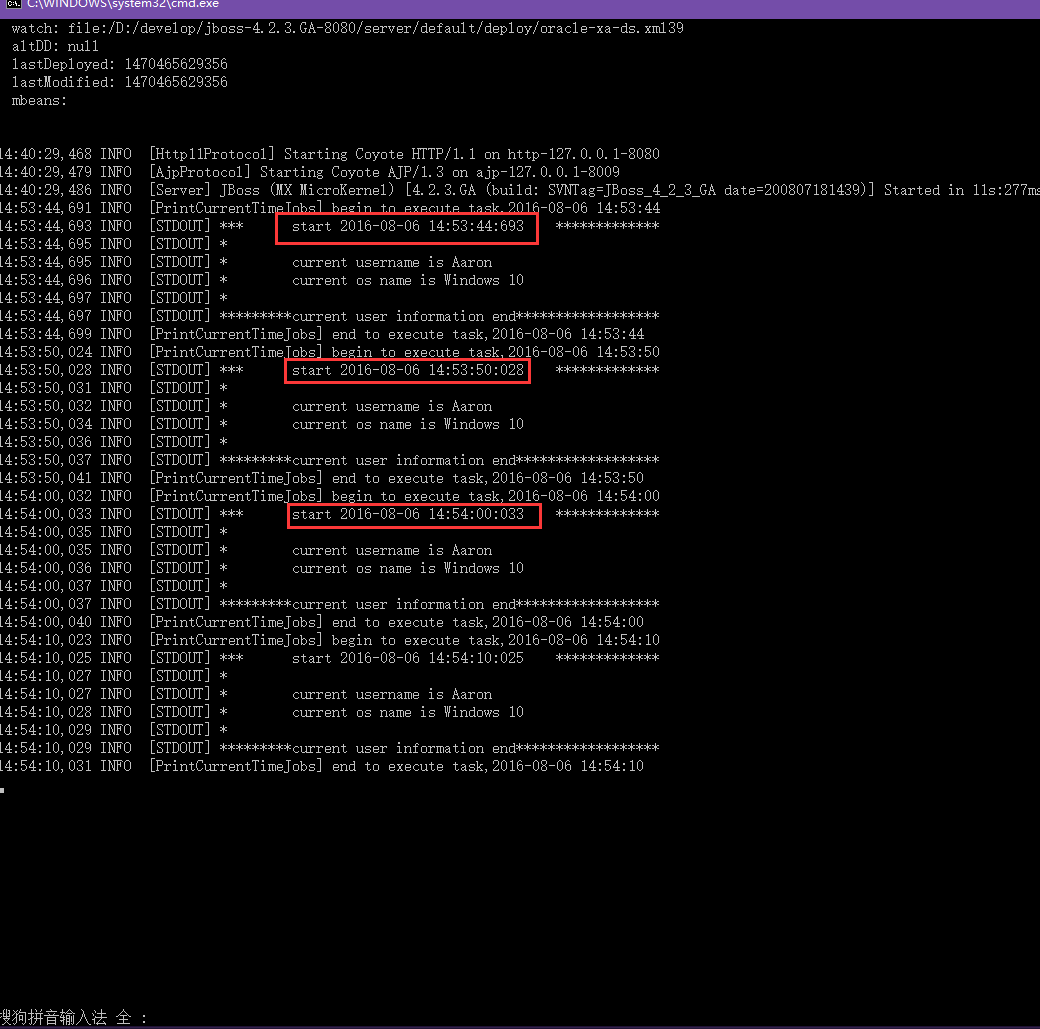
这个关了正在跑定时任务的端口后,之前的另一个没有跑的端口开始接管,继续运行定时任务

至此,我们可以清楚地看到,在分布式定时任务中(或者集群),同一时刻只会有一个定时任务运行。
以上就是极悦小编介绍的"基于spring+quartz的分布式定时任务框架",希望对大家有帮助,想了解更多可查看Java分布式应用教程。极悦在线学习教程,针对没有任何Java基础的读者学习,让你从入门到精通,主要介绍了一些Java基础的核心知识,让同学们更好更方便的学习和了解Java编程,感兴趣的同学可以关注一下。
 Java实验班
0基础 0学费 15天面授
 Java就业班
有基础 直达就业
 Java夜校直播班
业余时间 高薪转行
 Java在职加薪班
工作1~3年,加薪神器
 Java架构师班
工作3~5年,晋升架构
提交申请后,顾问老师会电话与您沟通安排学习

